How Do You Fix bagged vs bagless vacuum for pet hair?
Start with the airflow path: bin or bag, filter, hose, wand, cleaner head, brush roll, and seals. pet hair is bulky and dander-bearing, so the disposal system affects both convenience and allergen exposure
- Turn the vacuum off and unplug it or remove the battery before inspection.
- Empty the bin or replace the bag before assuming the motor is weak.
- Check the brush roll, end caps, hose elbows, cyclone screen, and filters in order.
- Clean or replace the part that is restricting airflow, rotation, or exhaust.
- Upgrade only when the same pet-hair failure returns after proper maintenance.
For the broader model-by-model rankings, see our guide to the best vacuum for pet hair.
Symptoms to Confirm First
The reader is comparing bagged and bagless vacuums before buying for a pet-heavy home. The right fix depends on the symptom. A vacuum that smells hot, leaves hair trails, stalls the brush, or blows dust from the exhaust is telling you where the failure is happening. Treat the machine as an airflow system rather than a sealed black box.
frequent emptying, dust clouds, filter cleaning, odor buildup, or confusion about long-term cost. Those clues are more reliable than guesswork. Pet hair maintenance gets frustrating when owners clean the visible bin but miss the hidden restriction at the cleaner-head intake, wand elbow, cyclone shroud, or pre-motor filter.
Before buying parts, do a no-cost reset: empty the container, remove hair wrap, inspect the hose with a flashlight, and clean filters according to the manual. Many pet-vacuum failures are not motor failures. They are packed-hair failures.
Diagnostic Order
- Power down safely. Unplug corded vacuums or remove the battery from cordless models.
- Empty the collection system. Pet hair should never be compacted above the max line.
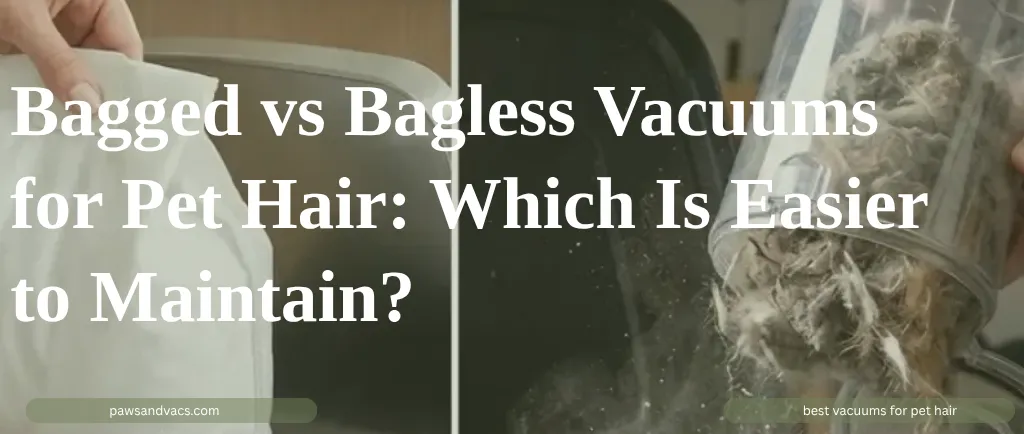
- Check the cleaner head. Remove hair from the brush core, end caps, belt area, and intake slot.
- Check the hose and wand. Look for hair plugs at elbows and where attachments narrow.
- Check cyclones and screens. Fine dander dust and fluff can coat mesh and reduce airflow.
- Check filters. Wash only washable filters and let them dry fully before reinstalling.
- Test suction at each point. Compare pull at the hose, wand, and floorhead to isolate the blockage.
Tools and Parts That Help
Main Symptom
frequent emptying, dust clouds, filter cleaning, odor buildup, or confusion about long-term cost. These symptoms usually appear after a fur-heavy room because hair is bulky enough to block airflow before the container looks completely full.
Root Cause
pet hair is bulky and dander-bearing, so the disposal system affects both convenience and allergen exposure. Pet homes expose weak points in the airflow path, especially narrow elbows, mesh shrouds, brush-roll ends, and filters that were designed around ordinary dust loads.
Tools to Keep Nearby
sealed bagged canister, large-bin bagless upright, HEPA exhaust filter, replacement bags or filters. Keeping these supplies near the vacuum turns maintenance into a five-minute reset instead of a full repair project.
Technical Point
Bagged vacuums usually win on cleaner disposal, while bagless cyclonic vacuums can reduce consumable costs if filters and cyclone screens are maintained. This is why a maintenance routine can restore performance without replacing the entire machine.
Fixes by Failure Point
| Failure Point | Pet-Hair Cause | Fix |
|---|---|---|
| Brush roll | Long hair wraps around the core and end caps. | Cut along the groove, pull hair away from bearings, and check belt tension. |
| Bin or bag | Fluffy hair blocks airflow before it looks heavy. | Empty early or replace the bag before suction drops. |
| Cyclone screen | Dander and fine dust coat the mesh after fur-heavy cleaning. | Brush the screen gently and follow the manual for washable parts. |
| Hose elbow | Hair clumps catch where the air path bends. | Use a flashlight and non-sharp flexible tool to clear the plug. |
| Filter | Pet dander loads the media and raises motor strain. | Clean or replace on schedule and never reinstall damp filters. |
A Pet-Home Maintenance Rhythm
After every heavy cleanup, empty the bin, glance at the brush roll, and remove visible hair from the end caps. Once a week during shedding season, check the filter face and the cyclone screen. Once a month, inspect attachment tools, especially mini motorized pet brushes that collect hair inside tiny turbine channels.
Bagged vacuums usually win on cleaner disposal, while bagless cyclonic vacuums can reduce consumable costs if filters and cyclone screens are maintained. A vacuum that is maintained this way keeps suction more consistent, smells cleaner, and lasts longer. The goal is not perfection after every pass; the goal is to prevent hair from becoming a mechanical load on the motor and brush system.
Mistakes That Make the Problem Worse
Avoid judging only by purchase price, emptying bagless bins indoors during allergy season, overfilling bags, and assuming every HEPA label means a sealed system. Those shortcuts often turn a simple cleaning reset into a replacement-part problem. If the machine has a warranty, follow the manufacturer instructions before opening sealed assemblies or washing any part that is not labeled washable.
If the same issue returns after every pet cleanup, compare the design of your current vacuum with pet-specific models. The best pet vacuums have easier brush access, larger bins or bags, stronger cyclonic separation, sealed filtration, and attachments designed for hair rather than only crumbs.
When to Upgrade
If emptying the vacuum triggers symptoms, cleaner bagged disposal may matter more than raw suction. Our main rankings explain which machines solve specific pet-home problems, from anti-tangle brush rolls to sealed HEPA systems and larger dirt cups. Start here: best vacuum for pet hair.
FAQ
What causes bagged vs bagless vacuum for pet hair?
pet hair is bulky and dander-bearing, so the disposal system affects both convenience and allergen exposure Start by checking the bin or bag, brush roll, filters, hose, and cleaner-head intake.
Can pet hair damage a vacuum?
Yes. Hair can stall brush rolls, strain belts, block cyclones, clog filters, and trap odor-causing debris. The damage usually comes from restricted movement or restricted airflow.
How often should pet owners inspect the vacuum?
Inspect the brush roll and bin after every fur-heavy cleanup. Check filters weekly during heavy shedding and monthly during normal shedding unless the manufacturer gives a stricter schedule.
When should I upgrade instead of repairing?
If emptying the vacuum triggers symptoms, cleaner bagged disposal may matter more than raw suction. Choose a pet-focused model with easier maintenance, better airflow access, and the right tool kit.